Sunday, July 31, 2011

DIY Preschool Backpack - My Favorite Project Yet

My personalized toddler drawstring backpack:


In just a few weeks all three of my little girls will start preschool twice a week. I want them to have unique and personalized bags no other kids at school have. I found this toddler drawstring backpack tutorial by Liz Stanley and used it as my starting point, but made some changes.

The changes I made were:

I lined my backpacks.


I added fabric shoulder straps.


I used ribbon instead of cording. Liz's directions called for two 58" pieces of cording, but I used two 53" pieces of grosgrain ribbon on Piper and Riley's bags to see if I liked it better than the cording I used on Sophie's bag. My preference is the ribbon, but you may like the cording better.

If you want to line your backpack, simply baste 12" x 14" lining onto the wrong side of your both of your 12" x 14" pieces of fabric.


Then turn your raw edges in and sew on all four sides.


Follow Liz's tutorial for detailed step-by-step instructions. I'm just showing the alterations I made to her fabulous tutorial. There's no need for me to try to give you all the steps when she did a beautiful job already.

After threading my ribbon through the finished bag, I tied a knot in the ends and singed them with a lighter so they wouldn't fray.

 
Then, I threaded the ribbon through the lined shoulder strap (simple tube of lined fabric - baste lining to fabric. turn raw edge of top and bottom down and sew. fold in half right sides together and sew the length of the fabric to make a tube. turn tube right side out. press. 3" x 11" prior to sewing)


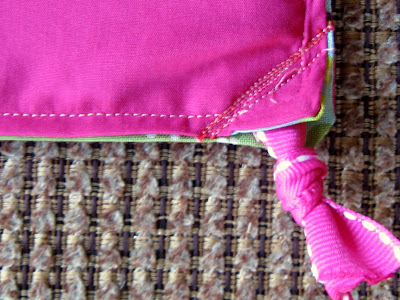
Turn backpack inside out. Use a seam ripper to open the bottom corner seam just a little. Push the knotted ribbon up through the hole. Use a straight or zigzag stitch to sew diagonally back and forth to secure the ribbon in the corner. Repeat with other ribbon on the other bottom corner.


Turn the bag right side out. Press. - you're finished!

Front:

 Back:


Worn by Piper:


All three girls' backpacks (notice Riley and Piper's have ribbon, but Sophie's has cording):


This has been one of my favorite DIY project yet! I think these bags are adorable and will be tickled pink to see my 3 Little Chicks wearing them on their first day of preschool.

Items Needed (for 1 backpack)
Sewing Machine with thread
Two 12 x 14 pieces of cotton fabric
Two 12 x 14 pieces of lining (I used broadcloth)
Iron on adhesive such as Wonder Under
Pins
Craft Felt
Two 53'' pieces of 7/8" grosgrain ribbon
Safety pin
Scissors
Iron

Thursday, July 28, 2011

Funny Funny Sophie - Kids Say

My four-year-old daughter, Sophie, and I were washing dishes together and chatting today. I asked her what she might learn this year in preschool. Sophie replied, "We'll practice letters, shapes, and spinach." "Spinach, what do you mean?" I asked. Sophie responded, "You know, you can talk in English or in Spinach."


Next she told me they would learn about different jobs like firefighters, police officers, and people that work at the bank. She said, "The bank is where you put your money for forty days and forty nights." Apparently Noah is our local banker.


Tuesday, July 26, 2011

3 Little Chicks at the Splash Pad

It's been over 100 degrees for twenty-some days in a row. This morning a friend and I decided to bring our six collective children to meet up at a splash pad park where the kids could play together in various water features. Unfortunately, upon arrival we were told that someone let their dog poo somewhere in the water area so it was closed for cleaning. We let our girls play on the playground instead. Then, one of our local news stations showed up and interviewed us about the splash park section being closed. Of course they did! We had just played with our kids for over an hour at the park where it was hot and muggy. We were sweaty. It was 9 AM, I had zero makeup on -- perfect time for an on-camera interview -ha!

 Riley, Piper, and Sophie - Splash Pad Park - Summer 2011

Piper 

Sophie 

Riley

We think Piper resembles Sophie. The final two pictures are of Piper, age 30 months, and Sophie age 26 months (taken 2 years ago at the same park wearing the same suit).

Piper - 2011

Sophie - 2009
 The splash pad area will be closed for at least 24 hours since they had to shock the water. After talking with the worker there, I now know they double filter the water and keep it sanitary. Good to know. : )


Saturday, July 23, 2011

DIY Initial Wreath

My in-laws came down to visit us this weekend and I needed to whip up a wreath for the front door to welcome them. With no time left to run to the craft store, I made do with things I found around the house. I had my mind set on making a wreath of some sort with our initial.

An empty diaper box provided the cardboard needed for my initial base. I used a box cutter to cut out two layers of cardboard. Then, I wrapped the two layers of cardboard together with masking tape.


Next, I hot glued leftover fabric onto the initial. This fabric coordinates with the flowers I found hanging out in my craft box.


Finally, I hot glued leaves and flower clusters onto the fabric and finished it with a pink grosgrain ribbon glued to the back.  I smile when I see my initial wreath as I pull into my driveway. This was a simple and free project that only took about 10 minutes to pull together.

Friday, July 22, 2011

Posh $8 Night Stand

Several years ago I bought this table new at a local furniture store. It cost next to nothing and was made of actual wood. The past couple of years have been unkind to this little table. No longer needed inside the house, we relocated it our back patio where it was exposed to the elements. At times this table was even used as a saw horse for cutting wood for other DIY projects. Cracked, weathered, and scratched, this table seemed damaged beyond repair. I didn't think it was good enough to donate to Goodwill. But, the idea of throwing in the trash and someone else grabbing it for a DIY makeover gave me the nudge I needed to breathe life back into it myself.

Before:


First, I sanded it and wiped it down. Then, I used wood filler to even out the deep gashes. After that, I spray painted the table with white Valspar primer.


The next day I bought this gorgeous spray paint by Valspar at Lowe's. It is called Exotic Sea and has a glossy finish and vibrant color


After:


This sophisticated table now proudly resides as a nightstand in Sophie's bedroom. Because I already had the table and the primer (leftover from a previous project), I only had to buy two cans of spray paint. Transporting the table from pathetic to posh only cost me $8.

Sunday, July 17, 2011

Kitchen Update Seven Years in the Making

Some people think the "Old World" kitchen is on its way out of style but after touring several Parade of Homes last month I was relieved to see the look is still going strong. Yes, there were a number of homes with contemporary designs, clean lines, and even an art-deco feel; but "Old World" still made a strong showing. I noticed an update was to paint the kitchen island or buffet a different color than the cabinets.
Reassured I wasn't making a style faux pas, I finally put a mocha glaze on my maple cabinets and painted my kitchen island red. Many of the blogs I follow show all white kitchens. They are beautiful, crisp, and have an airy feeling, but I love color. Plus, I have 3 little chicks who would wreak havoc on an all-white kitchen.

Before - maple cabinets and island with just a light stain.


We built our home seven years ago and the cheap builder's-grade clear coat failed and left much to be desired. Several of the cabinets and drawers had these scratch-looking water marks that I couldn't seem to get rid of. I can't believe I put this project off for so long. Look at those drawers - ugh! I kept them clean, but they were well worn.


Our weapons of choice:


Judd applied two coats of primer on the island. Since we were painting it red we used a blue-tinted primer for better coverage.


We chose Allen and Roth for Valspar paint in "Bodega". We took the paint chip to Sherwin-Williams because they could color match it and had red-based tintable paint for better coverage and deeper color. Over the years we've learned if using a deep color, such as red, don't use regular paint with the color recipe added to it (which is what would happen if purchased it at Lowe's). If going that route, it will take layer after layer after layer after layer to slowly build up the depth of color desired. But, if the paint starts out with a red tint prior to the color recipe being added to it, the desired depth of color is reached in only two coats (sorry no picture of the can of pain). Then, I applied three layers of clear coat and hope that's enough to ward off those pesky water spots in the future.

After -


For the cabinets I used Valspar Translucent Color Glaze in Mocha. I brushed on some glaze with a chip brush and used a cloth to rub off the excess while concentrating the color in the frame and moulding details. After the glaze dried (about 48 hours) I applied three coats of Kel-Thane II Waterborne Interior Clear Coat. I applied five coats on the cabinets below the kitchen sink since that area contained the most water marks in the old clear coat.


We love our updated kitchen. It looks richer, deeper, and more colorful with noticeable details. Yes, we should have done this years ago, but at least we finally accomplished the look we've wanted.

Thursday, July 7, 2011

Muffins So Good You'll Eat the Paper

I like using recipes from Jessica Seinfeld's cookbook Deceptively Delicious. Today I tried one of her muffin recipes and it was a big hit for all 5 of my family members. Never before have I had this kind of success. Usually, one or two of my kids won't like the recipe, but today we all wolfed these down . Sophie begged for a second muffin. While I was in another room Riley scooted a chair over to the counter and stole a second muffin. When I came back into the room, Piper was walking around chewing her muffin. I noticed she only had 1/3 of her paper liner in her hand. Upon inspecting her mouth, I saw she was chewing on the rest of her muffin paper! Now that's a girl who enjoys this recipe. This is a pretty healthful recipe with less sugar, oil, or butter than most recipes. One thing to note -- due to less oil or butter the muffins do tend to stick to paper liners. Next time I won't use them.


Applesauce Muffins (makes 12 - 16 muffins)

Topping
2/3 cup old-fashioned oats
1/4 cup firmaly packed brown sugar
1 teaspoon cinnamon
2 tablespoons butter

Batter
1 1/2 cups all-purpose flour
1 cup old-fashioned oats
1 teaspoon baking powder
1/2 teaspoon baking soda
1/2 teaspoon cinnamon
1 cup unsweetened applesauce
1/2 cup milk
1/2 cup carrot or butternut squash puree
1/2 cup firmly packed brown sugar
1/4 cup canola oil
1 large egg

1. Preheat oven to 400 degrees F. Coat a muffin pan with cooking spray.
2. In a small bowl, stir together the ingredients for topping.
3. In a large bowl stir together batter ingredients
4. Spoon batter evenly into muffin tin and sprinkle with topping. Bake until done 18-20 minutes.