Wednesday, December 7, 2011

DIY Initial t-shirt

Two years ago I began a little Christmas tradition. I made my 3 little chicks matching t-shirts with their initials on them. My inspiration was this adorable shirt which came from frogsandfairydreams.com


I love the items they sell. I wanted three long sleeved shirts, but that would have cost me $90+. So...I decided to do it myself -- with a few alterations. I created a similar look on my computer simply using my inexpensive printshop software (my hubby helped me tweak the design) and we printed it onto transfer (iron on) paper which I bought at Hobby Lobby using my 40% off coupon.

I followed the directions and ironed the designs onto white long sleeved shirts the girls already owned. Each year I can tweak the design, color, font, etc. and can easily make new matching t-shirts. I chose pink and green so the girls could continue to wear them long after Christmas is over.


I may embellish each shirt this year with a bow. If I do, I'll attach the bow with a snap so it can be removed when the shirt is washed.

The total for all three shirts was only $7.

Simple. Frugal. Fun.

Friday, November 18, 2011

Pumpkin, Moss, and Burlap Wreath

Weeks ago I fell in love with this wreath I found on Pinterest


Coupon in hand, my 3 little chicks and I headed to our local Hobby Lobby to buy our supplies.


Supplies:
1 large bag Spanish Moss - $3 (it was 50% off $6)
5 mini pumpkins - $3 total (they were 80% off)
Wooden floral picks - $1.80 (were $3 but I use my 40% off coupon)
18"  of 45" wide burlap ($2)
Wreath - free (left over from a previous project)
Hot glue gun and several glue sticks (already owned)

Total: $10

Sophie helped me make our wreath while the twins napped. I worked in small sections applying lots of hot glue. Sophie laid the moss on top of the glue and I smashed it down (burning my fingers countless times). After we covered all but the very back of the wreath with moss, it was time to add the pumpkins. I hot glued a wooden floral pick to the bottom of each mini pumpkin. Then, I simply jabbed the pumpkin pick into the wreath creating a cluster with the pumpkins rather than spreading them apart.


I'm not thrilled with my burlap bow. There's probably a better way to make it. I cut a 6" by 20" section of burlap, made a large loop around the top of the wreath and hot glued the two overlapping burlap ends together. Then I took a 6" by 45" section of burlap to create the bow part. I attached the bow to the loop with a little floral wire. My burlap is fraying, so there must be some secret to keeping it intact. I kind of like the fraying though since this is sort of a rustic wreath.


I'm sorry about the poor picture quality. In reality, my wreath does look quite similar to the original. My moss looks Christmas tree green in the picture, but it's not. The pumpkins on my wreath were the "sugared" kind which look goofy in this picture. With so many beautiful finds on Pinterest, I'm glad I finally got around to actually making something I pinned and loved.

Happy Thanksgiving!
Jennifer

Monday, October 31, 2011

Pumpkin Patch 2011

This autumn Piper and Riley are old enough to enjoy fall festivities like their older sister Sophie. Their Grandma Cole joined us at the local pumpkin patch to capture the experience.


Grandma took over 200 pictures. Many of them look something like this...Riley being silly, falling off a pumpkin.


But Grandma just kept snapping away knowing that she just might catch this...


Tuesday, October 4, 2011

Sophie's Date Night With Daddy

One of the many great things about the two-day-a-week preschool Sophie attends is the way they include family members in special ways. Tonight Sophie and Judd went on a special date together at the preschool. Sophie adores her daddy and daily asks him to marry her (which means they dress up as a prince and princess and dance together). She carefully picked out her outfit tonight, made sure her teeth were sparkling clean (princesses want fresh breath and clean teeth), put on her lip gloss (ChapStick) and brushed her hair a million times. She even wore Mommy's best perfume too.


At school tonight they ate football shaped cookies, gave tours of the classroom, and completed some fun activities. Sophie's teacher sat down with her to have her answers questions like:

How tall is your daddy?  - 3 feet
How old is your daddy? - 12

... and so forth. All her answers were written on a little keepsake certificate for her scrapbook.

Daddy and daughter both had a wonderful evening. I know Judd continues to set the dating bar very high for any future boys who want to date Sophie (years and years from now). And that's one more reason I love him!


Monday, October 3, 2011

Shoe Organization - A Way to Reuse Toddler Toy Rings

About a year ago I decided my three girls would keep the bulk of their shoes in a faux leather bin sitting on our dryer. When we exit our home through our laundry room, the girls' shoes are easy to grab. It also means when we return, their shoes come off and go right in the bin so as not to drag grass and dirt through the house.

That's all well and good except for one little problem -- flip flops. We love them around here and in glancing I quickly counted eleven pair. Today it dawned on me to reuse the old toddler rings we have buried in the bottom of our toy boxes. Do you have any of these guys laying around?


I simply slipped the flip flop straps through the little slit in the toy ring.


Now we don't waste time rummaging through the bin trying to find the flip flop's mate. When we're wearing our flip flops, the empty rings are attached to the rim of the bin, ready and waiting for us to return.


I can throw all the "good enough to wear next year" flip flops in our summer clothes storage and won't have to waste time matching them up later I may even try this tip with their regular shoes too. I may have to fight my girls for these rings though since they like to wear them as bangle bracelets.

Monday, August 22, 2011

Sweet Potato Lentil Stew in the Slow Cooker


With an overcast day, light drizzle, and the coolest temperature we've had all summer, I opted to try a new slow cooker recipe. It did not disappoint. I cannot overstate how delicious and simple this sweet potato-lentil stew was. We ate it with fresh baked artisan rustic bread picked up from the bakery today.

Slow Cooker Sweet Potato Lentil Stew

Ingredients:
32 oz. soup stock of your choice (I used Swanson reduced sodium chicken broth)
1 16oz. package of brown lentils (rinsed and drained)
2 large or 3 small sweet potatoes, peeled and cut into 1 inch pieces
1 teaspoon paprika
1 teaspoon basil
1 teaspoon coriander
1 teaspoon fennel (ground or seed -- I used seed)
1 teaspoon cumin

Directions:
Spray crock with nonstick spray or lightly coat with olive oil. Add all ingredients to the slow cooker. Give them a little stir. Cook on low 6-8 hours or high 4 hours. Use pieces of crusty bread to scoop up the hearty goodness.

Thursday, August 4, 2011

DIY Lunch Bag

When my 3 Little Chicks go off to preschool in three weeks they will take their lunches with them. The school requires the student's lunch to be in only one container so the teachers can just pop off the lid and move on to help the next child. The leak-proof divided food containers I purchased are an awkward size requiring me to make my girls their own lunch bags. I really wanted to use oilcloth, but neither Hancock nor Jo-Ann Fabrics carried any. So, I purchased tablecloth vinyl with flannel backing for the exterior of the bag and rip stop nylon for the interior of the bag.


I sewed on a felt initial and added ribbon handles.


The rip stop nylon provided the waterproof lining I wanted.


I covered cardboard with the rip stop and laid it in the bottom of the bag to help it keep its shape.


To taper the top of the bag, I made a kick pleat then added Velcro across the top.


I wish it matched the backpacks I just made, but this lunch bag is a cute runner up.

Sunday, July 31, 2011

DIY Preschool Backpack - My Favorite Project Yet

My personalized toddler drawstring backpack:


In just a few weeks all three of my little girls will start preschool twice a week. I want them to have unique and personalized bags no other kids at school have. I found this toddler drawstring backpack tutorial by Liz Stanley and used it as my starting point, but made some changes.

The changes I made were:

I lined my backpacks.


I added fabric shoulder straps.


I used ribbon instead of cording. Liz's directions called for two 58" pieces of cording, but I used two 53" pieces of grosgrain ribbon on Piper and Riley's bags to see if I liked it better than the cording I used on Sophie's bag. My preference is the ribbon, but you may like the cording better.

If you want to line your backpack, simply baste 12" x 14" lining onto the wrong side of your both of your 12" x 14" pieces of fabric.


Then turn your raw edges in and sew on all four sides.


Follow Liz's tutorial for detailed step-by-step instructions. I'm just showing the alterations I made to her fabulous tutorial. There's no need for me to try to give you all the steps when she did a beautiful job already.

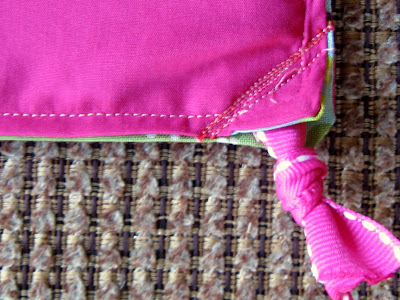
After threading my ribbon through the finished bag, I tied a knot in the ends and singed them with a lighter so they wouldn't fray.

 
Then, I threaded the ribbon through the lined shoulder strap (simple tube of lined fabric - baste lining to fabric. turn raw edge of top and bottom down and sew. fold in half right sides together and sew the length of the fabric to make a tube. turn tube right side out. press. 3" x 11" prior to sewing)


Turn backpack inside out. Use a seam ripper to open the bottom corner seam just a little. Push the knotted ribbon up through the hole. Use a straight or zigzag stitch to sew diagonally back and forth to secure the ribbon in the corner. Repeat with other ribbon on the other bottom corner.


Turn the bag right side out. Press. - you're finished!

Front:

 Back:


Worn by Piper:


All three girls' backpacks (notice Riley and Piper's have ribbon, but Sophie's has cording):


This has been one of my favorite DIY project yet! I think these bags are adorable and will be tickled pink to see my 3 Little Chicks wearing them on their first day of preschool.

Items Needed (for 1 backpack)
Sewing Machine with thread
Two 12 x 14 pieces of cotton fabric
Two 12 x 14 pieces of lining (I used broadcloth)
Iron on adhesive such as Wonder Under
Pins
Craft Felt
Two 53'' pieces of 7/8" grosgrain ribbon
Safety pin
Scissors
Iron

Thursday, July 28, 2011

Funny Funny Sophie - Kids Say

My four-year-old daughter, Sophie, and I were washing dishes together and chatting today. I asked her what she might learn this year in preschool. Sophie replied, "We'll practice letters, shapes, and spinach." "Spinach, what do you mean?" I asked. Sophie responded, "You know, you can talk in English or in Spinach."


Next she told me they would learn about different jobs like firefighters, police officers, and people that work at the bank. She said, "The bank is where you put your money for forty days and forty nights." Apparently Noah is our local banker.


Tuesday, July 26, 2011

3 Little Chicks at the Splash Pad

It's been over 100 degrees for twenty-some days in a row. This morning a friend and I decided to bring our six collective children to meet up at a splash pad park where the kids could play together in various water features. Unfortunately, upon arrival we were told that someone let their dog poo somewhere in the water area so it was closed for cleaning. We let our girls play on the playground instead. Then, one of our local news stations showed up and interviewed us about the splash park section being closed. Of course they did! We had just played with our kids for over an hour at the park where it was hot and muggy. We were sweaty. It was 9 AM, I had zero makeup on -- perfect time for an on-camera interview -ha!

 Riley, Piper, and Sophie - Splash Pad Park - Summer 2011

Piper 

Sophie 

Riley

We think Piper resembles Sophie. The final two pictures are of Piper, age 30 months, and Sophie age 26 months (taken 2 years ago at the same park wearing the same suit).

Piper - 2011

Sophie - 2009
 The splash pad area will be closed for at least 24 hours since they had to shock the water. After talking with the worker there, I now know they double filter the water and keep it sanitary. Good to know. : )