Showing posts with label Sewing. Show all posts

Monday, February 25, 2013

Threads -- My Little Sewing Business

A couple of friends recently kept encouraging me to start my own little sewing business. So, I began Threads Custom Fabric Creations and have been busy ever since.

Come "like" me on facebook! Threads Custom Fabric Creations

I have already sewn at least twenty drapes, some lined and some unlined. Here are just a few:


I've played with all types of fabrics and textures. One client even had me make cafe curtains out of painter's drop cloth. I love her enthusiasm and out-of-the-box thinking.


I've made several Monogrammed Tooth Fairy Pillows which come with a poem in the pocket ($15/ea.). These make adorable gifts for children and parents The Tooth Fairy likes the ease of finding the tooth in the pocket rather than spending a ridiculous amount of time searching under the pillow for her oldest daughter's sacred tooth. Ahem...um...I mean...these pillows are great to hang on the outside of the bedroom door.


This week I'll be sewing looped ribbon security blanket "lovies" ($15/ea.) for a couple of baby showers. They are ultra soft and coordinate with each baby's nursery theme. I'll post pictures of them as soon as they are finished. Here are a few I've previously sewn for other babies:


Now that I'm sewing as a business, it's about time I get some of my own labels. What fun!

Wednesday, October 24, 2012

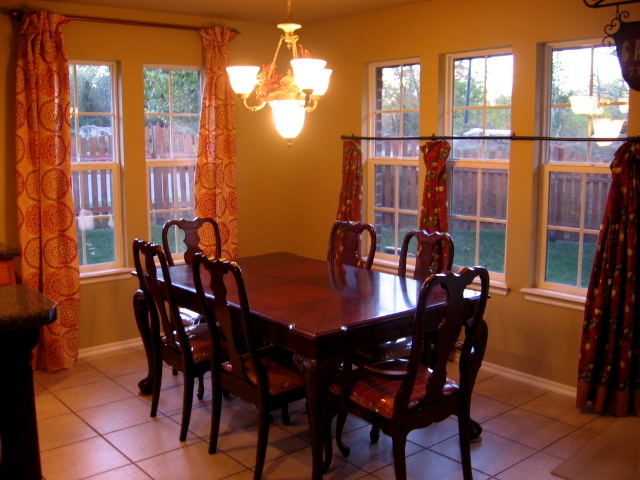
Dining Room Transformed with New Curtains

Ten years ago I sewed these cafe curtains for our breakfast nook area. Although I liked the rust-colored fabric, it always felt heavy and dark in this space.


We lived with those curtains for many years even though they were too short. I ended up adding a complimentary fabric to the bottom so they would be the proper length. I also replaced the glass table with a larger wooden table and recovered the chairs with matching fabric.


After having these curtains for so long I was ready for a change. I wanted the breakfast nook to look brighter, lighter, and more updated. I was looking for something less traditional but still keeping within my original color scheme.

While looking at hundreds of fabrics at Joann's it was actually my five-year-old, Sophie, who picked out the fabric for our new curtains.


This fabric is heavy-duty indoor/outdoor fabric which will not fade. It was easy to work with too. For those reasons I decided not to bother lining them. I sewed four simple panels and used rings with clips to attach them to new curtain rods. The curtains rods were made from electrical conduit (really cheap and very sturdy) from Lowe's. My husband sprayed painted the rods and cheap unfinished wooden finials a gorgeous metallic bronze color. Our traditional, dark, and heavy breakfast nook was transformed into this:


The new curtains on the left and the old cafe curtains on the right


I love them! Our space seems so much brighter, lighter and more modern.


Before

After

Friday, July 20, 2012

DIY Tooth Fairy Pillow (Tutorial)

Sophie starts Kindergarten this fall. When we toured the classrooms at Kindergarten Roundup earlier this spring I noticed a chart listing all the teeth various students lost during their Kindergarten school year. That poster brought up all sorts of questions from Sophie. Will it hurt? Who is the Tooth Fairy? Why does she want teeth? Does she pull my teeth? Can she give me prizes instead of money? (The Tooth Fairy will be more than happy to give prizes instead of money).

When I was a child my sister and I both had special Tooth Fairy pillows. After realizing I could make at least three pillows (one for each of my girls) for less than the price of purchasing one pillow from Etsy or ebay, I went into DIY mode.


I let Sophie choose the fabric. I really like the print she chose for the main pillow portion. I personally would have chosen a different print for the pocket, but Sophie loved these two prints together. My only "rule" was that she could NOT pick any licensed fabric (e.g., Disney, Hello Kitty, etc.). I'm not a fan of highly commercialized cartoon images and feel prints and solids create a boutique quality product.

Items Needed:
  • Two 6” x 6” squares of fabric for pillow
  • One 4” x 5” contrasting fabric for pocket
  • 27” of 5/8” grosgrain ribbon (12” for handle and 15” for bow embellishment.)
  • Initial badge pin (Hobby Lobby $.99) 
  • Poly-fil or pillow stuffing of your choice


Directions:
For the pocket, fold over all four edges, WRONG sides together 1/2" and sew.


Pin the WRONG side of pocket to the center of the RIGHT side of one pillow square (so both the pillow square and pocket are RIGHT side facing you). Sew sides and bottom of pocket to pillow square.


Pin 12” of grosgrain ribbon on the RIGHT side of the same pillow square at the 1” and 5” locations. Make sure your ribbon handle is pinned DOWN from the top edge looping down toward the pocket. Make sure your pins are lower than your seam allowance so you can remove them once you turn your pillow right side out.


Sew the pillow fabric RIGHT sides together leaving a small opening to turn the fabric right side out. Remove pins which held the ribbon in place.


Stuff the pillow with poly-fil, fabric scraps, recycled plastic sacks, or whatever you wish to use as your stuffing. Sophie enjoyed getting to do this part. Hand-sew opening closed.


Add the initial badge pin to the pocket and hand-sew a bow (made from 15” of 5/8” grosgrain ribbon) onto the pillow at a diagonal.


The back looks like this...


Sophie, Piper, and Riley love the way their Tooth Fairy pillows turned out. It was a fun and quick little project in which they could participate. Now I better let the Tooth Fairy know she needs to stock up on prizes rather than money for the teeth in this household.

Thursday, August 4, 2011

DIY Lunch Bag

When my 3 Little Chicks go off to preschool in three weeks they will take their lunches with them. The school requires the student's lunch to be in only one container so the teachers can just pop off the lid and move on to help the next child. The leak-proof divided food containers I purchased are an awkward size requiring me to make my girls their own lunch bags. I really wanted to use oilcloth, but neither Hancock nor Jo-Ann Fabrics carried any. So, I purchased tablecloth vinyl with flannel backing for the exterior of the bag and rip stop nylon for the interior of the bag.


I sewed on a felt initial and added ribbon handles.


The rip stop nylon provided the waterproof lining I wanted.


I covered cardboard with the rip stop and laid it in the bottom of the bag to help it keep its shape.


To taper the top of the bag, I made a kick pleat then added Velcro across the top.


I wish it matched the backpacks I just made, but this lunch bag is a cute runner up.

Sunday, July 31, 2011

DIY Preschool Backpack - My Favorite Project Yet

My personalized toddler drawstring backpack:


In just a few weeks all three of my little girls will start preschool twice a week. I want them to have unique and personalized bags no other kids at school have. I found this toddler drawstring backpack tutorial by Liz Stanley and used it as my starting point, but made some changes.

The changes I made were:

I lined my backpacks.


I added fabric shoulder straps.


I used ribbon instead of cording. Liz's directions called for two 58" pieces of cording, but I used two 53" pieces of grosgrain ribbon on Piper and Riley's bags to see if I liked it better than the cording I used on Sophie's bag. My preference is the ribbon, but you may like the cording better.

If you want to line your backpack, simply baste 12" x 14" lining onto the wrong side of your both of your 12" x 14" pieces of fabric.


Then turn your raw edges in and sew on all four sides.


Follow Liz's tutorial for detailed step-by-step instructions. I'm just showing the alterations I made to her fabulous tutorial. There's no need for me to try to give you all the steps when she did a beautiful job already.

After threading my ribbon through the finished bag, I tied a knot in the ends and singed them with a lighter so they wouldn't fray.

 
Then, I threaded the ribbon through the lined shoulder strap (simple tube of lined fabric - baste lining to fabric. turn raw edge of top and bottom down and sew. fold in half right sides together and sew the length of the fabric to make a tube. turn tube right side out. press. 3" x 11" prior to sewing)


Turn backpack inside out. Use a seam ripper to open the bottom corner seam just a little. Push the knotted ribbon up through the hole. Use a straight or zigzag stitch to sew diagonally back and forth to secure the ribbon in the corner. Repeat with other ribbon on the other bottom corner.


Turn the bag right side out. Press. - you're finished!

Front:

 Back:


Worn by Piper:


All three girls' backpacks (notice Riley and Piper's have ribbon, but Sophie's has cording):


This has been one of my favorite DIY project yet! I think these bags are adorable and will be tickled pink to see my 3 Little Chicks wearing them on their first day of preschool.

Items Needed (for 1 backpack)
Sewing Machine with thread
Two 12 x 14 pieces of cotton fabric
Two 12 x 14 pieces of lining (I used broadcloth)
Iron on adhesive such as Wonder Under
Pins
Craft Felt
Two 53'' pieces of 7/8" grosgrain ribbon
Safety pin
Scissors
Iron

Thursday, June 9, 2011

Curtain Trim & Blueberries

Last week when I told you about recovering my dining room chairs, I mentioned I had enough fabric leftover to add trim to my cafe curtains. When I originally sewed these curtains, I intentionally made them short so I could easily sweep beneath them. (Feeding three little kids 3 meals a day plus a snack results in lots of crumbs.)


As you can see, I made them too short. So, I added some leftover fabric to the bottom as coordinating trim.


I think they look much better.


Now everthing ties in together nicely. The plaid on the chair does match. It's just appears to have pink hues rather than burnt orange like the curtains.


On a completely unrelated topic -- we have blueberries! This was our first year to try  growing anything edible. My family eats a lot of fruit and is particularly fond of blueberries. We purchased two blueberry plants from Lowe's and planted them several weeks ago.


Every day or two we check to see which berries have turned blue and are ready for picking. The girls enjoy pulling off the ripe berries, rinsing them off, and eating food that is as fresh as one can get.


I think blueberry pancakes are calling my name.

Monday, January 24, 2011

Bows I Whipped Up This Weekend and Tutorial

Moms have asked me how I keep all three of my little girls so adorably dressed. My secret is simple. I don't think you have to spend a lot of money on a toddler's outfit, but if you add a great hair bow and throw on cute shoes, people notice. Magically, large boutique bows attract attention away from the oatmeal and yogurt smeared on my girls' shirts. Couple the bow with a great pair of shoes and people think we always have our act together.

Because I am a DIY kind of girl, I make most of my girls' hair bows. Here are a few I whipped up this weekend.


I made two of the smaller size to use on pigtails.


I also made this little cutie pie.


My friend Amanda has her own hair bow business called Wisp Clips. I totally stole this bow idea from her. Imitation is the highest form of flattery. If you don't have the time or desire to make your own hair bows, visit Wisp Clips. Amanda makes adorable bows and each item is $1 off through January 31st. I am not being compensated for telling you about Amanda's Wisp Clip business. I just like Amanda and think she makes really cute bows.

Here Piper is wearing the zebra print bow I made and I don't even notice the French toast and yogurt on her shirt. Distract-a-bow to the rescue once again! Maybe I should start my own hair bow business and call it "Distract-A-Bow-Boutique" ha! Yeah, I'll do that in my free time ha ha.


I learned how to make my own twisted boutique bows by watching this YouTube video. The "twisted" bows pop up taller and fuller rather than lying flat. This YouTube author uses a plastic card template, but I don't. Also, I use alligator clips and she uses French clips. Just use whatever you prefer.


Now if I could just find a glue gun that didn't burn my fingers... : )