Showing posts with label Tutorial. Show all posts

Sunday, July 31, 2011

DIY Preschool Backpack - My Favorite Project Yet

My personalized toddler drawstring backpack:


In just a few weeks all three of my little girls will start preschool twice a week. I want them to have unique and personalized bags no other kids at school have. I found this toddler drawstring backpack tutorial by Liz Stanley and used it as my starting point, but made some changes.

The changes I made were:

I lined my backpacks.


I added fabric shoulder straps.


I used ribbon instead of cording. Liz's directions called for two 58" pieces of cording, but I used two 53" pieces of grosgrain ribbon on Piper and Riley's bags to see if I liked it better than the cording I used on Sophie's bag. My preference is the ribbon, but you may like the cording better.

If you want to line your backpack, simply baste 12" x 14" lining onto the wrong side of your both of your 12" x 14" pieces of fabric.


Then turn your raw edges in and sew on all four sides.


Follow Liz's tutorial for detailed step-by-step instructions. I'm just showing the alterations I made to her fabulous tutorial. There's no need for me to try to give you all the steps when she did a beautiful job already.

After threading my ribbon through the finished bag, I tied a knot in the ends and singed them with a lighter so they wouldn't fray.

 
Then, I threaded the ribbon through the lined shoulder strap (simple tube of lined fabric - baste lining to fabric. turn raw edge of top and bottom down and sew. fold in half right sides together and sew the length of the fabric to make a tube. turn tube right side out. press. 3" x 11" prior to sewing)


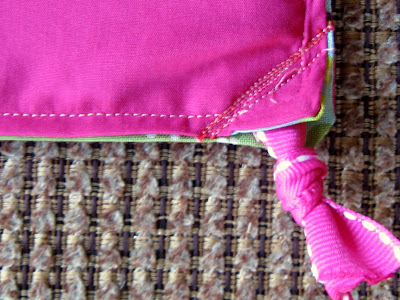
Turn backpack inside out. Use a seam ripper to open the bottom corner seam just a little. Push the knotted ribbon up through the hole. Use a straight or zigzag stitch to sew diagonally back and forth to secure the ribbon in the corner. Repeat with other ribbon on the other bottom corner.


Turn the bag right side out. Press. - you're finished!

Front:

 Back:


Worn by Piper:


All three girls' backpacks (notice Riley and Piper's have ribbon, but Sophie's has cording):


This has been one of my favorite DIY project yet! I think these bags are adorable and will be tickled pink to see my 3 Little Chicks wearing them on their first day of preschool.

Items Needed (for 1 backpack)
Sewing Machine with thread
Two 12 x 14 pieces of cotton fabric
Two 12 x 14 pieces of lining (I used broadcloth)
Iron on adhesive such as Wonder Under
Pins
Craft Felt
Two 53'' pieces of 7/8" grosgrain ribbon
Safety pin
Scissors
Iron

Wednesday, May 19, 2010

My Sagging Hamper Had a Little Work Done

I bought this canvas hamper in Target's dollar section several months ago. It matched my black and white bathroom decor and was an upgrade from the worn out mesh hamper I previously used. But...it was frumpy, and that bugged me. I know I certainly have more important things to do than be bothered by a frumpy hamper, but every time I opened my linen closet door, there it was, staring at me, in its poor, pathetic, droopy way. It's been begging for a little nip & tuck. Nothing major. Not, like a Joan Rivers, Cat Woman, or Kenny Rogers type of overhaul. Just a little lift.


I decided to reinforce the inside of the hamper with wire. Using wire cutters, I cut a wire hanger to the height of the hamper. Using pliers, I bent both ends of the wire over to eliminate a sharp wire edge which may poke through the canvas.Then, I covered the wire with black electrical tape to make sure it wouldn't rust if it came in contact with any damp towels (which should never be thrown in the hamper while damp, but...).


Turning the hamper inside out, I hot glued a long strip of scrap fabric to the side wall of the hamper leaving the center of the fabric free from glue the entire length. This created a fabric tunnel into which I slid the wire.


I reinforced the hamper this way three times in all.


An easy five-minute project produced the results I wanted. My hamper looks uplifted, refreshed, and like it just got back from vacation --if only I did!

Tuesday, April 27, 2010

Costume Clothes Rack


My three year old daughter, Sophie, loves to dress up in little costumes. She changes clothes at least five times a day. She has an assortment of fairy wings, tutus, twirl skirts, a Chinese Kimono style outfit, several gymnastic leotards, and a few princess dresses. Of course she also has the bunny ears, rock star headphones and gloves, jewels, shoes, and tiara accessories as well.


Originally, I kept all of these costumes in her closet. I got tired of having to pick up all her regular clothes which became disheveled while she played with her dress-up clothes. I built her a kid-sized clothes rack for her costumes and moved it into the corner of the playroom.

This project cost about five dollars and only took about 12 minutes to make. All of the clothes rack parts are made from 3/4" PVC pipe and joints found at my local Lowe's store.

The rack requires two T-shaped joints and six elbow joints. I had two long sections of PVC pipe I cut up for the legs, supports, and clothing bar.


At first I tried to cut my long PVC pipe down into smaller sections using a saw and miter box. That proved a bit challenging.


Fortunately my husband handed me this nifty little red-handled wire thingy that cut through the pipe like a hot knife through butter - eeeeeeasy.


After I cut my pipe lengths, I just stuck everything together. I didn't glue it because I want to be able to disassemble it.


Sophie loves having easy access to all her costumes. She spends at least an hour a day dancing like a princess in her playroom with her sisters, me, or her daddy.

Friday, March 5, 2010

Ribbon Lovie (Security Blanket) Tutorial

Six of my friends just had, or are about to have, babies. I decided to make each baby a ribbon lovie (security blanket). My own girls love the ones I made for them. They enjoy playing with the ribbon loops and rubbing their hands or face on the soft minky fabric. It makes a great gift for a newborn or a 1st birthday. My oldest daughter is almost three and still cuddles with her lovie all the time.

This project will take about 30 minutes (especially if you are snapping pictures and writing notes as you go - ha!)

You need two 11" by 14" rectangles of fabric. I used navy blue flannel for one piece and light blue ultra soft cuddle fabric (minky or chenille) for my other piece.


This lovie has fourteen ribbon loops around the outside edge. Cut fourteen lengths of ribbon, 4" each. I like to mix and match ribbon colors and widths, but always use grosgrain ribbon.


Pin ribbon loops onto the RIGHT side of ONE blanket piece matching raw edges of ribbon and blanket. I spaced my ribbons at the 2", 5", 8", and 11" marks for the fourteen inch side of the blanket.


Loops should be down away from the edge of the blanket.


I spaced my ribbon loops at the 2.5", 5.5", and 8.5" marks for the eleven inch side of the blanket.


Sandwich the ribbon loops between the Right sides of the two blanket pieces. Pin right sides of blanket pieces together. You should not be able to see any ribbons.


Using a 1/2 inch seem allowance, stitch around the perimeter of the blanket layers leaving a small opening for turning right side out. After you turn it right side out, sew the small opening closed. The finished blanket will be approximately 10" by 13".


Roll it up and tie it with a matching ribbon and name tag. Smile as you enjoy the adorable gift you just made. This lovie is for baby boy, Rhett. Only five more to go!

Tuesday, February 23, 2010

Ruffled Onesie - Tutorial

My fellow crafty bloggers have been sewing ruffles on everything for quite some time now. I decided to give it a try and quickly found out ruffles (especially in knit) are very easy to sew. Now, I'm addicted.

So, I made this cutie pie! This is a picture of the back of the onesie.


I wanted to add three rows of red ruffles on the bottom of a plain white onesie/bodysuit. The bodysuit measured roughly 9 inches across.


I cut my red knit fabric 1 inch tall and 22.5 inches across(which is 9 in. x 2.5). The ruffle fabric should be about 2 1/2 times the width of the onesie.


Since knit fabric doesn't fray, there was no need to sew the edges of my ruffle fabric.

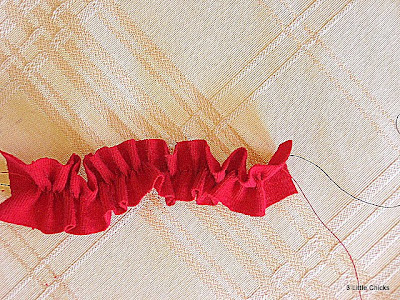
I set machine to the longest straight stitch possible (basting stitch) and sewed right down the middle of my ruffle fabric the entire length. I did not backstitch at either end so I could do the next step. (I only used black thread for this tutorial so it would show up better in the pictures.)


I pulled only ONE thread while bunching the fabric up into ruffles.


I eyeballed where I thought the ruffle looked even and pinned it onto the onesie. I sewed it onto the onesie sewing right down the middle of the ruffle. I backstitched at the beginning and end this time.


I made two more ruffles and sewed them onto the onesie as well, bunching them together so they overlapped just a bit.


On the front of the onesie I sewed on a little ruffle flower and added a button to the center. To make the ruffle for the flower, I sewed my basting stitch on the side of my ruffle fabric instead of down the center. When I pulled one thread, the sewn side ruffled while the other side fanned out creating the flower. I stitched it in a circle onto the onsie and sewed the button on by hand.


Since I have twins, I did this whole project twice. It was very simple and took about an hour to create both onesies. I was flying by the seat of my (ruffled) pants and enjoying the learning-as-I-go process.

Now I want to chop up all my old t-shirts and put ruffles on everything!

Monday, February 15, 2010

Felt Chocolate Chip Cookie Tutorial

Sophie is quite a girlie girl. She loves baby dolls, purses, shoes, sparkly dresses, and shopping with her little grocery cart. Her imagination runs wild when "cooking" too, so, I made her some felt chocolate chip cookies to add to her grocery stash.


Felt cookies are very easy to make.

Step 1) Cut two "cookie" circles out of tan felt and five "chocolate chips" from dark brown felt.


Step 2) Sew chocolate chips onto one tan cookie circle.


The back will look unsightly, but no one will see it.


Step 3) Sew RIGHT sides of the two tan cookie circles together, leaving a small opening for turning.


Step 4) Turn cookie right side out. Add some stuffing (batting) between the cookie layers.


Step 5) Sew small opening closed.

Sophie is enjoying her felt cookies while wearing her chocolate chip cookie pajamas.